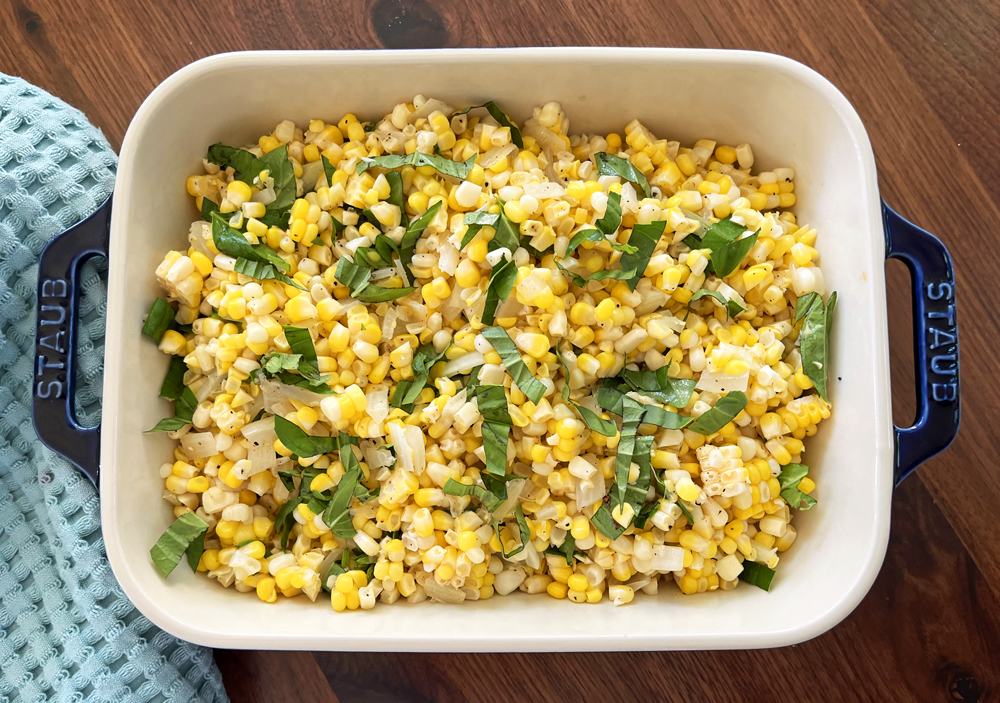
Yogurt with Berries and Granola


When you want a really light, delicious breakfast, snack or dessert, nothing beats good yogurt, berries and granola. This is a dish that I make all the time, but never think of writing down.

We usually buy the best whole milk plain yogurt we can find (Brown Cow makes amazing yogurt!) and then add a little honey or jam. My favorite jam to add is Spicy Peach, paired with Cinnamon Granola. But you can really use almost any jam or fruit, even a frozen berry mix if you want to, and any granola you have on hand.

Ingredients

1 cup any berries – blueberries, raspberries and blackberries are good
1 cup plain whole-milk yogurt
1 1/2 Tbsp Spicy Peach Jam
handful of Cinnamon Granola

In a wide, flat bowl start with yogurt, and drop jam over in little plops. (Technical term.) Toss berries and then granola over. Stir gently and devour.

Cinnamon Granola

Granola with fresh berries!

One of our favorite breakfast places, First Watch, has a great Chia Seed Pudding, made with coconut milk, berries and really cinnamonny granola.

I make it at home sometimes, but it’s the granola that I make over and over again, using a recipe from Melskitchencafe.com.

Mel bakes her granola at a higher temperature, and let’s it cool completely before breaking it up. It stays in little chunks that way.

I use this granola for snacking, or on top of oatmeal or with fruit over yoghurt. It’s so good.

Ingredients

6 cups old-fashioned rolled oats
½ cup brown sugar
1 cup chopped pecans (can use other nuts, too.)
1 Tbsp ground cinnamon
1/2 tsp kosher salt (use 1/3 tsp if using table salt)

Syrup:
½ cup light olive oil
½ cup honey or agave nectar
1½ tsp vanilla extract

Preheat the oven to 325 degrees F.

Line two half sheet pans with parchment paper or a silpat mat and set aside.

In a large bowl, combine all of the granola ingredients and toss or stir to evenly combine.

In a small bowl, blend syrup ingredients until well-combined. Pour the syrup over the granola ingredients and stir until all the ingredients are evenly coated.

Scrape half of the mixture onto each sheet pan. Spread into an even layer.

Bake for 15-25 minutes, stirring once or twice and rotating pans halfway through. Keep an eye on the color – you want it to be lightly brown, without getting burned.

Leave it to cool completely. Gently break it up and store in an airtight container.

Pie Crust Recipes: Traditional Pastry and Graham Cracker Crust

I don’t often make pie crusts from scratch, but when I do, I have the best luck with this recipe.

Traditional Pie Crust:

1 3/4 cup flour
1/2 tsp salt
1/2 cup vegetable oil
3-4 Tbsp cold water

With a fork, stir together flour and salt in a medium bowl. Pour in vegetable oil and mix gently until the mix is quite crumbly.

Dribble in 3 Tbsp of cold water and gently start mixing it in. The dough will start to stick together and start to form large lumps. If it isn’t, add the rest of the water.

Lay out a section of waxed paper that is twice as wide as it is tall and fold it in half. Unfold it and dump the pie dough onto the bottom layer. Form a flattish 6″ circle. You don’t want to beat it up – just pull all the loosish bits together. Fold the top over and begin to roll it out in a rough circle.

Keep your pie pan handy, and keep rolling until your circle is roughly 1/2″ – 1″ bigger than the pie pan. Remove the top layer of wax paper and “roll” the crust around the rolling pin. Unroll the crust over the pie pan, gently tugging and pushing down so the crust is well-seated in the pan.

Fold the edges up and under themselves, cutting off any extra-long bits and adding them anywhere your crust isn’t quite long enough. Then you can either use a fork to create a ridged edge, or you can crimp the edge with your hand. It’s easier to see than read – here is a video showing how to  crimp a pie crust.

Prick with a fork all over the bottom and bake at 425 for 12-15 minutes.  No chilling – and no baking beans or whatever.  Just pop it in the oven and bake it. You want the edges of the crust to just begin to darken. You’ll also smell a cooked flour aroma.

Remove from oven and allow to cool.

Add filling.  (If you’re using the crust for a filling that needs to bake, just fill it first and follow the baking times for baking a filled pie.)

Graham Cracker (or other cookie) Pie Crust:

1 1/2 cups crushed graham crackers or BelVita Honey and Nuts cookies (3 packs of 2 cookies each)
1/3 cup melted butter
3Tbsp of sugar (1 1/2 Tbsp if you are using Belvita Cookies.)

Mix in a bowl, then dump into a pie pan, gently spreading the crumbs with the back of a spoon, going up the sides of the pan as well.  (Doesn’t have to be perfect – partway up is fine.)   Bake for 10 minutes at 350, remove and let cool before filling.

Napa Cabbage & Noodle Salad

This is a tangy and delicious cabbage and noodle main dish salad, based on Hannah Che’s recipe from The Vegan Chinese Kitchen Cookbook. It’s perfect for a late summer evening supper, because it’s easy, super fast and has a dressing that is unbelievably good – plus it’s gluten-free and vegan. If you can’t get Napa cabbage, Romaine lettuce works, too.

INGREDIENTS
1/2 head Napa cabbage, cut in half lengthwise
1 small cucumber, seeds removed and julienned, or cut into little bite sizes
1 tsp kosher salt

2 cups fresh rice vermicelli noodles (Pho noodles) 1 1/2 cup dried noodles.

1 medium carrot, julienned
1 scallion, cut into 1/8″ rounds (both white and green part)
1/2 cup coarsely chopped fresh cilantro
1/4 chopped cashews or peanuts
1 Jalapeno pepper, seeded, halved and cut into thin slices

Dressing:

2 Tbsp Soy Sauce
3 Tbsp rice vinegar (cider vinegar would also be fine, I think)
1 Tbsp Oyster Sauce (or Hoisin Sauce for a vegan version)
2 1/2 Tbsp sugar
2 1/2 Tbsp toasted sesame oil
2 large garlic cloves, crushed

DIRECTIONS

Cut cabbage lengthwise a few times, then cut very thin slices. Add cabbage and cucumber into a colander and toss with the salt. Leave to drain.

Start water boiling in a small saucepan, add noodles and cook 5-10 seconds. Drain and rinse with cool water. Cut noodles into smaller sections with a scissors. If you are using other noodles, cook as directed on the package, then drain and rinse with cool water. You want to end up with about 1 1/2 cups cooked noodles.

Mix dressing ingredients well in a small bowl. Taste and add more soy sauce if you think it needs it. Add dressing to noodles and toss to combine.

Gently press cabbage and cucumber to remove some of the water. You can also squeeze it gently in your hand. Place in a large bowl, and add noodles, carrots, scallions and cilantro. Toss in a large bowl and top with nuts.

Serve immediately. Yum.

Quick & Easy Raspberry Jam (No Pectin)

Is there anything better than the sweet, tart flavor of fresh raspberry jam?

I picked up some gorgeous raspberries and decided to make jam, but didn’t have any pectin. A quick online search turned up a super-simple recipe from Camilla on FabFood4All.com. She measures ingredients by weight and makes a larger batch.

Costco sells raspberries in 12 ounce packages, so that determined my batch. I do often weigh ingredients, but have included volume measurements as well, since some people prefer that.

This recipe is so easy – and even without pectin, it gels really well.

Ingredients

340 gms / 12 oz. / about 3 cups fresh raspberries, washed and gently dried
297 gms / 1 1/2 cups sugar
2 Tbsp and 1/2 tsp lemon juice

Place all ingredients in a medium saucepan on medium heat and bring to the boil, stirring gently from time to time. Keep on heat for 7 minutes, stirring constantly. I use a flat edged wooden spoon to keep scraping the bottom so it doesn’t burn or stick. In the meantime, put a small saucer in the fridge to chill.

Remove from heat and put a few drops on a the chilled saucer. Put back in the fridge for a minute. Remove and nudge the drops with a spoon or your finger. If the jam is ready it will wiggle a little and have a jammy consistency. If it is very runny, put it back on the heat for another couple of minutes. Remember, it will also thicken a little as it cools.

Pour into clean, sterilized jars (read my Simple Canning post for help) and seal. Mine made enough for one and a half jars. We’re just keeping it in the fridge since we know we’ll eat it soon.

Just writing about it made me hungry, so I had to have a slice of bread with butter and jam. So good!

The Most Important Herbs & Spices for a New Cook

My daughter Maya says that most of her friends have no idea what herbs and spices to get when they get their first kitchen. She’s been bugging me forever to help with a list of starter herbs and spices for a new cook, since the spice aisle can be pretty overwhelming.

So here is my list of must have herbs and spices – the ones I reach for most frequently. I’ve also created a second list to add as you can and a list of shelf stable pantry essentials.

7 Absolute Essentials

Kosher Salt
Whole Black Pepper (in a grinder is great)
Red Pepper Flakes
Powdered Garlic
Dried Thyme
Cumin Powder
Dried Basil

These will let you cook Italian, Cajun, Tex-Mex or good old American flavors.

2nd Level to Add

Cinnamon
Whole Nutmeg with a grater
Ground Cloves
Dried Parsley
Rosemary
Chili Powder
Bay Leaves
Paprika (I love Smoked paprika)
Oregano

Adding these spices as you can will open up lots of other possibilities.

Other Pantry Essentials

For Cooking:
Olive Oil (not virgin – just regular, lighter)
Diced, Canned Tomatoes
Rotel Tomatoes
Canned beans (Black beans are my favorite)
Coconut Milk, canned or in a tetrapak
Apple Cider Vinegar
Rice (I like Basmati Rice for general cooking)
Pasta
Chicken Stock in cubes or shelf stable tetra-pack blocks
Fish Sauce (Sounds weird – but it adds so much to Italian food and Thai Foods.)
Dijon Mustard

For Baking or Desserts
Sugar
All-Purpose Flour
Baking Powder
Baking Soda
Cocoa Powder
Corn Starch
Vanilla

DIY Dried Herbs:

Don’t forget that you can always dry fresh herbs. So if you get a nice handful of fresh parsley, use what you need for your recipe, and set the rest on a plate on the counter to dry out for a few days. Once they’re are dry, just crush the leaves and store them in a bottle. You can pitch the stems. Same thing with Thyme and Rosemary – or really any fresh herb.

Mustafa’s Daal (Lentils)

After visiting Kumy’s Mom at the beginning of last year, we were reminded how incredibly delicious Pakistani food is!  We were also lucky enough to learn how to make Daal from Mummy’s cook, Mustafa, who is an amazing cook.

It’s a fairly easy recipe, and uses a “bagaar” to add flavor.  It was one of the first things we made when we got back.  I’m happy to say it was just about as good as Mustafa’s and a welcome reminder of our visit back “home”.

Ingredients:

1 cup Masoor Daal (small, round, split red lentils)
1/2 cup Moong Daal (small, oval split yellow lentils)

4 cups water
2 tsp crushed garlic
1 tsp salt
1/4 tsp ground cayenne pepper (add more if you dare – it was originally 1 1/4 tsp – but that was too hot!)
1/4 tsp turmeric
3/4 cup diced onions
3/4 cup diced tomato  (Can also substitute 1 can of Rotel Tomatoes for the tomato and jalapeno.)
1/2 jalapeno, diced, optional
1/4 cup cilantro, rough-chopped, optional

Bagaar:
2 Tbsp oil
1 1/2 cloves of garlic, roughly chopped
1 1/4 tsp whole cumin
3 dry red chilis/peppers (small, round ones, but you can use two long red ones instead.)

Wash both daals well, swirling and rinsing until the water is mostly clear. Add to a large pot. Then add water, garlic, salt, cayenne, turmeric, onions and tomatoes. Cook 30-40 minutes.

Whisk well and add water to get a thick gravy consistency, as needed. You can also use an immersion blender to puree the daal, but be careful not to over do it. Add Jalapeno and Cilantro, and cook 10 minutes more.

In a small frying pan, heat the oil and add the rough-chopped garlic, cook for a minute and then add the dry red chilis/peppers and cumin seeds. Cook 30 seconds more and pour oil mixture right into the daal. Stir to combine and serve with basmati rice or Naan. Can also add a squeeze of lemon when serving if you wish.

New Year’s Day Hoppin’ John

It’s a Southern tradition to eat Hopping John (Black-eyed Pea Stew) on New Year’s Day for good luck all year, and this year, I’m not taking any chances!

I started with Ree Drummonds recipe. Ree adds a ham hock and says that you can also add a can of diced tomatoes, or a few cups of torn-up Kale. I skipped the ham hock, but may try the tomatoes or kale the next time I make it. If you don’t like black-eyed peas, it’s also good with black beans – it’s a great, comforting dish perfect for a cold Winter’s Day!

Ingredients:

4 Tbsp butter (or 2 Tbsp bacon drippings & 2 Tbsp olive oil) (Or just 4 Tbsp olive oil for a vegan version)
1 large yellow onion, diced
4 cloves garlic, minced
1 bell pepper, any color, diced
2 stalks celery, diced
3 14-oz cans black-eyed peas, drained and rinsed
1 quart chicken stock (or veggie stock for vegan)
1 tsp Kosher salt
1/2 tsp freshly ground black pepper
Good pinch of red pepper flakes
2 tbsp. white wine vinegar
White rice

Heat butter or bacon drippings and oil in a cast iron skillet. Add, onions, bell pepper and celery. Saute for about 5 minutes, until onions are translucent. Add garlic and saute another 2-3 minutes.

Add black-eyed peas, chicken stock and seasonings. Don’t add the vinegar yet! Bring to a simmer, cover and let cook 30 minutes. Remove lid, stir and let cook another 15 minutes, stirring occasionally.

Add vinegar and stir. Check seasonings. Serve in a bowl over hot rice.

Smoky BBQ Beans (Vegan)

This is another side that I made for our Smashburger dinner the other night. It’s a Jamie Oliver recipe, and somewhat simplified but we loved its smokier, tangier flavor.

2 Tbsp olive oil
1 large onion rough chopped,
2 cloves of garlic, crushed or 2 heaping tsp garlic puree
1/2 tsp red pepper flakes
1 heaping tsp smoked paprika
1 tsp cumin seeds
1 cup pureed tomatoes
2 small cans vegetarian baked beans
1/3 cup BBQ sauce (I used Sweet Baby Ray’s BBQ sauce, which is vegan)
1/2 tsp kosher salt – or to taste

Heat olive oil in a large frying pan. Add onions and garlic and sautee several minutes until softened and just starting to turn golden.

Add spices and cook a little longer. Add tomato puree, beans and BBQ sauce. Stir wlel, heating through and put in a baking dish. Bake uncovered at 350 degrees for at least 30 minutes.

Low Country Shrimp & Sausage “Boil” (It’s Baked!)

I can’t really remember where I found this version of the classic Southern recipe. I had jotted down the ingredients on a piece of paper that rattled around in my purse for weeks.  But I finally made it, and it was crazy good and so easy.

Rather than boiling you roast everything in the oven.

Ingredients

1 lb. baby red potatoes, halved
2-3 Tbsp olive oil
1 tsp kosher salt
1/2 tsp freshly-ground black pepper

1 lb. shrimp peeled and tails removed
1 lb. smoked sausage, cut into 1″ pieces
4 ears of sweet corn, shucked and cut into three inch pieces
1 bell pepper, cut into bite-sized pieces (not traditional but I love peppers)
1 1/2 Tbsp Old Bay Seasoning

6 Tbsp butter, melted
1/2 tsp garlic powder
lemon wedges

Heat oven to 400 degrees.

Place potatoes in a big bowl and toss with olive oil, salt and pepper.  Place on a baking sheet and bake for 15-20 minutes, until they’re quite soft when you poke them with a fork.

In the same large bowl, toss shrimp, sausage, corn, pepper and Old Bay Seasoning until everything is nicely coated. Add to baking dish. (I used a rubber spatula to get every last drop out!)

It will be pretty crowded, but that’s totally fine. Just spread things out a bit, and bake another 12 – 15 minutes, until the pepper is a little softened and the shrimp looks done.

Stir garlic powder into melted butter and drizzle over the whole pan. Serve with wedges of lemon.

So quick, easy and delicious. I’m going to try other vegetables – perhaps zucchini or eggplant? Everything tastes wonderful in this dish.

Note:  I looked up a recipe for Old Bay Seasoning (Food.com has a pretty highly rated one) but it uses a million ingredients, and makes an awful lot.  But if you really want to make your own, here is the link: https://www.food.com/recipe/old-bay-seasoning-copycat-189447