Version #2 with grape tomatoes, cucumbers and cashews.
Saw Emily Paster’s recipe in Midwest Living Magazine and realized I had everything I needed to make it. It’s so good and ready in just a few minutes. The dressing would be great on other fresh veggies, too. It’s really the perfect summer salad and we ate every last drop!
Ingredients 2 Tbsp lime juice 1 Tbsp fish sauce 1 Tbsp honey (or agave nectar or sugar) 1 Thai (or Serrano) chile, seeded and minced 2 Tbsp light olive oil ( or a neutral oil like canola oil) 5 medium plum (or heirloom) tomatoes, sliced 1/4 of a red onion, sliced 1/2 cup chopped fresh herbs – I used regular basil and spearmint, but you can also use Thai Basil and peppermint 1/2 cup dry roasted peanuts, chopped – I used half peanuts and half cashews 1/4 teaspoon flaky sea salt
Directions
For dressing: whisk together lime juice, fish sauce, honey and the chile, then continue whisking whil you slowly drizzle in the oil.
Arrange tomato slices on a large platter. Top with onion, herbs and nuts.
Spoon dressing over salad, sprinkle with flaky sea salt and serve immediately.
Version #2; Used grape tomatoes, with some quartered, sliced cucumbers (about a cup) and used cashews instead of peanuts. It was good, too.
My friend Vicky brought this salad to work the other day and said she always makes some to keep in the fridge. I had to try it because I love how colorful it is and that it has so much protein. You can always soak the beans yourself, but canned beans makes this incredibly fast. Vicky uses a little good red wine vinegar, but we ended up using a vinaigrette instead. It was so good.
Ingredients:
1 can black beans, rinsed and drained 1 can Garbanzo beans, rinsed and drained 1 package frozen Edamame, thawed 1 orange or red bell pepper, chopped 1/2 yellow onion, chopped 3 Tbsp wine vinaigrette (I used Brianna’s Blush Wine Vinaigette)
Add onions to vinaigrette in a small bowl, stir well and let it pickle for about 10 minutes.
Add everything together in a large bowl, and sprinkle with a little kosher salt. Delicious right away and keeps well in the fridge for a few days.
I found this recipe by The Doctor’s Kitchen, aka Dr Rupy Aujla, on the BBC website. I was incredibly skeptical about these flavors combined, but I have to say I am totally won over.
It’s super satisfying – a very solid healthy main dish, and very quick and easy to make. I made some tweaks, since he uses some ingredients less easily available in the US.
It uses mostly pantry ingredients, but tastes super fresh and delish. Kumy and I had it with naan and we totally devoured it! It’s also great with toast.
Ingredients 2 Tbsp olive oil 1 yellow onion, halved and thinly sliced (red’s fine, too) ½ tsp kosher salt 1/4 tsp freshly ground black pepper 1 can chopped tomatoes, with juice (14.5 oz) 2 tsp honey 1 small dry red chilli, deseeded and broken into chunks 3/4 tsp ground cinnamon ½ tsp paprika 1 tsp dried oregano 1 can Cannellini beans, drained and rinsed, 14.5 oz (Can use any white beans.) 8 oz baby spinach (really big handful) Feta cheese, crumbled for garnish
Instructions Preheat oven to 400.
Heat the oil in a large oven-proof frying pan over a medium heat. Add the onion and season with salt and pepper. Cook for 3-5 minutes until softened.
Add the tomatoes, honey, chilli, cinnamon, paprika and oregano. Simmer for a few minutes. Stir in the beans and the greens. Toss the spinach to help it wilt.
Bake uncovered for 20 minutes and serve sprinkled with Feta.
Ina Garten has one of the best recipes for Lemon Pureed Potatoes. I basically make her potatoes, but I don’t peel the potatoes and I just mash them. But they are absolutely incredible. It’s basically just mashed potatoes, but you add lemon zest at the end, which completely transforms it. It doesn’t need gravy or extra butter or anything – it’s perfect just the way it is.
Ingredients:
2½ lbs large Yukon Gold potatoes, washed but not peeled, cut into 1″ pieces 2 tsp Kosher salt 1 tsp freshly ground black pepper ½ lb (2 sticks) butter or vegan butter 3/4 cup whole milk or whatever plant-based milk you like 1 Tbsp grated lemon zest (2 lemons)
Half fill a large pot with water and add a tablespoon of salt. Add potatoes, and bring to the boil. Turn down the heat and let them simmer for 15-20 minutes until nice and soft when you poke them with a fork.
Remove from heat, drain and mash with a potato masher. Add salt, pepper and butter and continue mashing until the butter has melted. Add the milk and stir well. If you’re going to serve right away, add the lemon zest and stir. Check seasoning and add more salt and pepper if needed.
I left the potatoes a little lumpy, since we like it that way. If you want them perfectly smooth, you can buzz them or run them through a food mill, but just add a 1/4 more milk if you do that. (That’s what Ina does.)
Ina says that the lemon zest can get bitter and to wait and add it later if you aren’t going to serve it right away. I haven’t noticed bitterness when I’ve had leftovers the next day, but just to be on the safe side, listen to Ina.
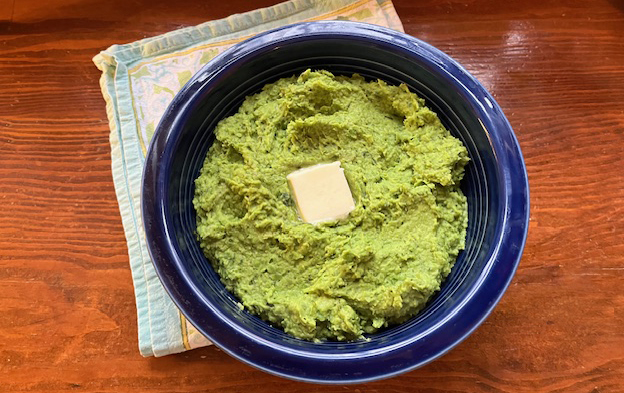
I’ve been dreaming about Mushy Peas ever since we came back from Ireland. Finally had a chance to make them last night, when our friends hosted a wonderful dinner with the Ireland trip gang.
Fresh mint really makes this dish something special and unbelievably (January in Nebraska?) I still had some growing. These very bright green Mushy Peas were surprisingly delicious and definitely worth making again.
Ingredients
1 Tbsp Olive Oil 1 24 oz bag frozen peas (not petite or baby – you want full-size peas) 1 bunch of scallions, greens and white parts, chopped into 1″ sections 1 shallot, roughly chopped big handful of mint leaves 1 ½ tsp kosher salt ½ tsp black pepper 3/4 stick butter, cut into chunks (can use vegan butter, too)
Heat olive oil in a large frying pan, and add scallions and shallots. Sautee for a couple of minutes and then add everything else except the butter. Stir well, cover and let cook over low heat for 5 minutes, shaking occasionally.
When you can see that the peas and scallions look softened and the mint leaves are wilted, remove from heat and transfer to a medium bowl. Use an immersion blender and buzz everything until it’s fairly smooth. (You can also use a food processor.)
Add the butter and stir until it’s completely melted. A little pat of butter makes a nice garnish! These also reheat nicely in the microwave.
This is the first dish I ever learned to cook when I moved to Karachi. I learned it from Kumy’s sister and mom and it remains an all-time favorite. I love to fish out the rounds of corn and dip them in the curry, but it can be messy! If you’re squeamish, cut the corn off the cobs before you cook it.
When sweet corn is in season, there is nothing better.
Ingredients:
6 ears sweet corn, cut into 1½” wide rounds 1 yellow onion, finely diced 3 Tbsp olive oil 1 large bunch cilantro, leaves and about 2″ of stems, rough chopped 2 jalapenos, seeded (if desired) and rough chopped ½ tsp ground turmeric 1 tsp salt 1 large clove of garlic (or 2 small) 1/2 cup corn water 3 Tbsp gram flour (check online for substitutes) 1 can coconut milk ½ lemon
Boil water (do not add salt!) in a large pot and cook corn pieces for 3-5 minutes, until tender. Remove from heat and drain, saving a cup or so of the corn water.
Heat oil in a large frying pan and add onion. Sauté on medium heat for several minutes until onion is soft and transparent. Let cool a bit.
Add cooked onions with cilantro, jalapenos, turmeric, salt, garlic and water, and buzz with an immersion blender or food processor until smooth. Then pour back into frying pan and cook for a few minutes, stirring constantly.
In a little cup, stir together a couple spoons of the corn water with the gram flour until smooth. Add gram flour slurry into the frying pan and cook a few more minutes to thicken, stirring frequently.
Reduce heat and add coconut milk. Stir well and finally add the sweet corn, tossing to coat with the curry.
Just before serving over rice, squeeze the juice of half a lemon over the dish. Yum!
I’ve made this amazing “Chickpea Salad” from The Pioneer Woman twice in two weeks. Does that tell you something? I did make a few changes to her recipe, but nothing too drastic. It’s a great side dish, or even main dish, since there’s protein in the garbanzos and feta. So delish!
I made it yesterday, holding back on the avocadoes and dressing until just before tossing it and serving it today at a picnic. So you can easily make it ahead of time.
INGREDIENTS:
2 15-ounce cans garbanzo beans, drained and rinsed 6 oz. feta, cubed (omit for a vegan version) 4-5 baby cucumbers, (or 1 English cucumber), cut into half moons (about 1 1/2 cups) 1 pt. cherry tomatoes, halved 1 red or orange bell pepper, diced 1/2 small red onion, thinly sliced (optional – Kumy doesn’t like raw onions, so I didn’t add this.) 2 avocados, cubed 1/2 cup chopped fresh Italian parsley
FOR THE DRESSING: 1/3 cup olive oil 3 Tbsp apple cider vinegar 2 Tbsp fresh lemon juice 1 Tbsp dried Basil 1/4 tsp garlic powder 1/2 tsp kosher salt 1/4 tsp freshly ground black pepper 1/4 tsp red pepper flakes 1/2 tsp sugar 1/2 tsp Dijon mustard
Mix all veggies, beans and feta in a large bowl. If making ahead, don’t add avocadoes.
Mix dressing ingredients in a mason jar, close lid and shake like crazy.
Drizzle dressing over and toss well.
Note for photo: my avocadoes were quite ripe, and were very creamy.
I don’t often make pie crusts from scratch, but when I do, I have the best luck with this recipe.
Traditional Pie Crust:
1 3/4 cup flour 1/2 tsp salt 1/2 cup vegetable oil 3-4 Tbsp cold water
With a fork, stir together flour and salt in a medium bowl. Pour in vegetable oil and mix gently until the mix is quite crumbly.
Dribble in 3 Tbsp of cold water and gently start mixing it in. The dough will start to stick together and start to form large lumps. If it isn’t, add the rest of the water.
Lay out a section of waxed paper that is twice as wide as it is tall and fold it in half. Unfold it and dump the pie dough onto the bottom layer. Form a flattish 6″ circle. You don’t want to beat it up – just pull all the loosish bits together. Fold the top over and begin to roll it out in a rough circle.
Keep your pie pan handy, and keep rolling until your circle is roughly 1/2″ – 1″ bigger than the pie pan. Remove the top layer of wax paper and “roll” the crust around the rolling pin. Unroll the crust over the pie pan, gently tugging and pushing down so the crust is well-seated in the pan.
Fold the edges up and under themselves, cutting off any extra-long bits and adding them anywhere your crust isn’t quite long enough. Then you can either use a fork to create a ridged edge, or you can crimp the edge with your hand. It’s easier to see than read – here is a video showing how to crimp a pie crust.
Prick with a fork all over the bottom and bake at 425 for 12-15 minutes. No chilling – and no baking beans or whatever. Just pop it in the oven and bake it. You want the edges of the crust to just begin to darken. You’ll also smell a cooked flour aroma.
Remove from oven and allow to cool.
Add filling. (If you’re using the crust for a filling that needs to bake, just fill it first and follow the baking times for baking a filled pie.)
Graham Cracker (or other cookie) Pie Crust:
1 1/2 cups crushed graham crackers or BelVita Honey and Nuts cookies (3 packs of 2 cookies each) 1/3 cup melted butter 3Tbsp of sugar (1 1/2 Tbsp if you are using Belvita Cookies.)
Mix in a bowl, then dump into a pie pan, gently spreading the crumbs with the back of a spoon, going up the sides of the pan as well. (Doesn’t have to be perfect – partway up is fine.) Bake for 10 minutes at 350, remove and let cool before filling.
I bumped into Artisan Bread with Steve on Youtube when I was looking for new bread recipes, and have been pretty addicted ever since. I am especially crazy about his turbo loaf that you bake in a cast iron skillet – since it’s ready in about 3 hours from start to finish – and has wonderful texture and flavor.
I love Steve’s videos: they’re very helpful, to the point and not video extravaganzas. He’s just a real guy baking great bread. Just look for Artisan Bread with Steve on youtube. He actually has a website, too: nokneadbreadcentral.com and has published couple of cookbooks that would be agreat Christmas gift for anyone who is interested in easy homemade bread.
I am including basic bread with sesame seeds that we really like, but you can add anything you like to the bread: chopped olives and rosemary, chopped walnuts and honey, or Feta with dill or whatever you can imagine*. I add lighter items like herbs and sesame seeds right at the start, and heavier things like cheese and olives after the first rise.
I also use Mel’s Kitchen Cafe’s trick of tossing in a handful of ice cubes on the bottom of the oven at the start of baking to add a little steam.
Ingredients:
13 oz warm water 1 1/2 tsp kosher salt 1 1/4 tsp yeast 3 1/2 cups flour (Steve uses bread flour, but I’ve had great luck with AP flour, too) 1/4 cup sesame seeds divided (optional)
Warm a medium-sized metal bowl with fairly hot water for a few minutes. Then dump the water and add 13 oz. warm water, salt, yeast and about 1/2 the sesame seeds. Stir just a bit with the handle of a wooden spoon.
Add flour and stir with the handle of the wooden spoon until all the dry flour is gathered up in a nice shaggy mess. If you need to, add a spoon or so of water to help gather eveyrthing up.
Cover with a clean towel and put in the oven with the oven light on. Let rise for 90 minutes. Make sure your oven rack is in the middle.
Uncover and stir again with the wooden spoon handle to collapse the dough a little.
Once the dough is reduced, sprinkle the rest of the sesame seeds over the dough and around the edges. Turn the dough around to get sesame seeds everwhere. Then do the same thing with a spoon of flour if desired.
Spray your cast iron skillet with cooking oil, and place the loaf in the skillet. Cover with a cloth and let it rise for 15 minutes on the counter. After 15 minutes, start preheating the oven to 400 degrees. Let rise 15 more minutes.
Put skillet in hot oven, toss a handlful of ice cubes to the bottom of the oven and let bake for 40 minutes. So good and so easy!
*If you’re adding other ingredients, add them after the first rise. Just flatten the dough in the bowl and evenly sprinkle 1/4 of whatever you’re adding over it. Then just fold the dough over and repeat the process until you’ve used everything up.
This is a tangy and delicious cabbage and noodle main dish salad, based on Hannah Che’s recipe from The Vegan Chinese Kitchen Cookbook. It’s perfect for a late summer evening supper, because it’s easy, super fast and has a dressing that is unbelievably good – plus it’s gluten-free and vegan. If you can’t get Napa cabbage, Romaine lettuce works, too.
INGREDIENTS 1/2 head Napa cabbage, cut in half lengthwise 1 small cucumber, seeds removed and julienned, or cut into little bite sizes 1 tsp kosher salt
1 medium carrot, julienned 1 scallion, cut into 1/8″ rounds (both white and green part) 1/2 cup coarsely chopped fresh cilantro 1/4 chopped cashews or peanuts 1 Jalapeno pepper, seeded, halved and cut into thin slices
Dressing:
2 Tbsp Soy Sauce 3 Tbsp rice vinegar (cider vinegar would also be fine, I think) 1 Tbsp Oyster Sauce (or Hoisin Sauce for a vegan version) 2 1/2 Tbsp sugar 2 1/2 Tbsp toasted sesame oil 2 large garlic cloves, crushed
DIRECTIONS
Cut cabbage lengthwise a few times, then cut very thin slices. Add cabbage and cucumber into a colander and toss with the salt. Leave to drain.
Start water boiling in a small saucepan, add noodles and cook 5-10 seconds. Drain and rinse with cool water. Cut noodles into smaller sections with a scissors. If you are using other noodles, cook as directed on the package, then drain and rinse with cool water. You want to end up with about 1 1/2 cups cooked noodles.
Mix dressing ingredients well in a small bowl. Taste and add more soy sauce if you think it needs it. Add dressing to noodles and toss to combine.
Gently press cabbage and cucumber to remove some of the water. You can also squeeze it gently in your hand. Place in a large bowl, and add noodles, carrots, scallions and cilantro. Toss in a large bowl and top with nuts.